Help:Making realistic cities
This page is intended to help users make cities that look realistic.
Look at real cities
If you want to create realistic cities in OGF, the best thing you can do is make a detailed observation of cities in the real world. Look at maps of real cities, especially ones you might want to use as a model for your fictional place.
Look at the differences between European, Asian, African, American and other cities. Look at the differences between cities that were built during different time periods. Look at where different cities are placed relative to rivers and harbors, as well as the influence of the underlying landscape - how the layout of the city changes between hills and valleys and flat areas. Imagine what it would be like to drive, or walk, or ride the train through these cities, and imagine what would be there.
If you're planning to use the area where you live as a model (a great idea for a beginner) take a look at your surroundings in real life. Look at the infrastructure around you and perhaps try to recreate it in OGF. Ask yourself questions you may not have considered before. What are the shapes of your local rivers or coastlines? How does the street layout change as you travel from urban to rural areas? Where have motorways been built, and where haven't they been built? What patterns exist in the street names where you live? You may notice things you've never noticed.
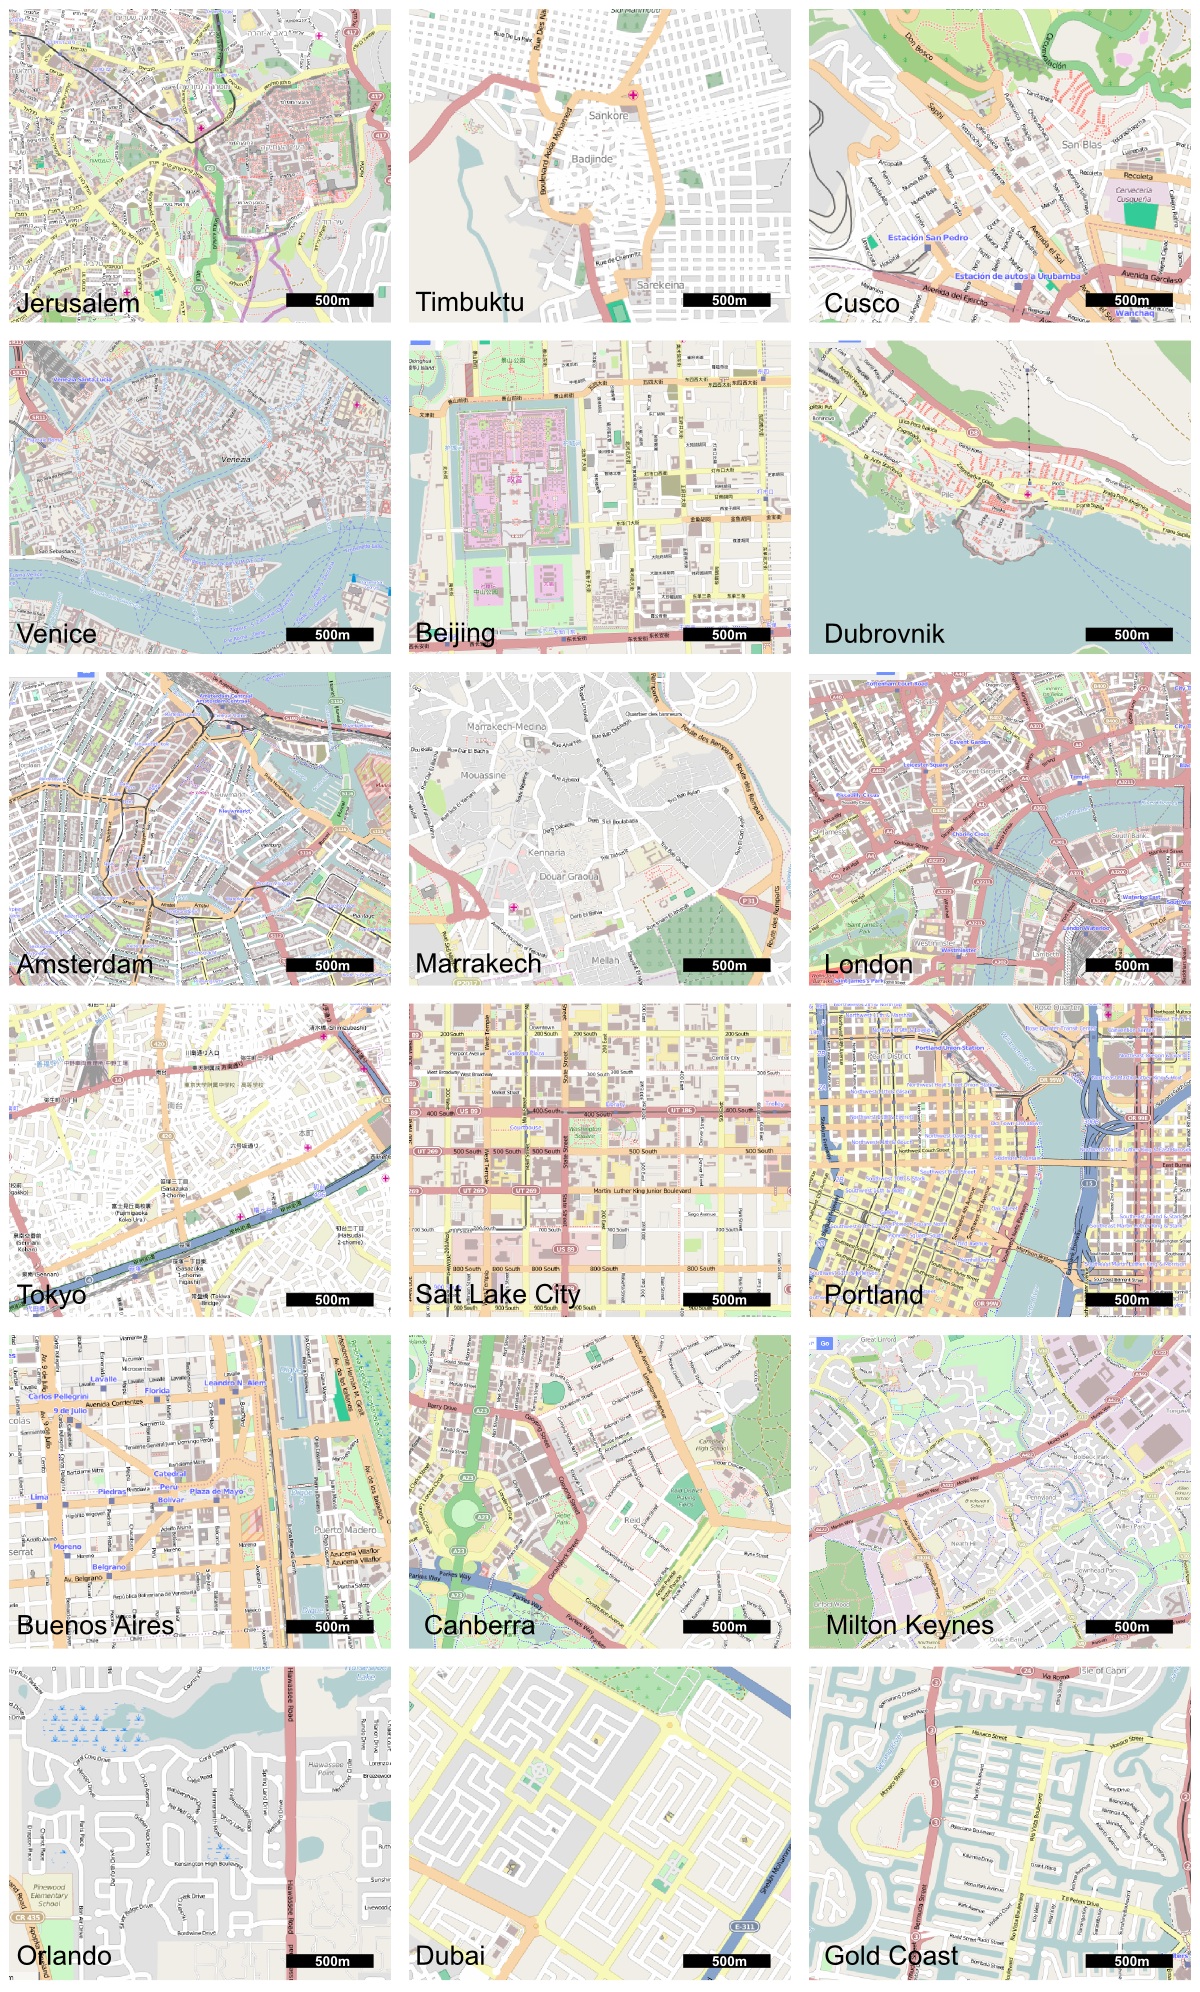
City layouts are fascinatingly diverse. Take some time to examine them and explore the different principles and patterns behind them. The maps below illustrate parts of various cities around the globe, all shown at the same scale (all courtesy OpenStreetMap):
Select a model city
What is the model region for the type of city you are developing? What is the form of the street layout there? And very important: how far apart are the streets? (Scale is a very difficult issue for many OGF users.) Always have a model city/model typology in mind and use this model as orientation. The model will not only help you in terms of patterns and scale for your urban landscape, but it can also provide a framework for your overall city size, a potential guide to your city's history, as well as ideas for themes and interesting focus points within your city. Don't try to develop a city without a model until you have successfully achieved realistic cities based on real world models. The artistry of OGF is rooted in understanding the principles of real life cities and creating new combinations of the urban elements in a realistic way, so that even though a new city is being created, it still follows the principles of the model city.
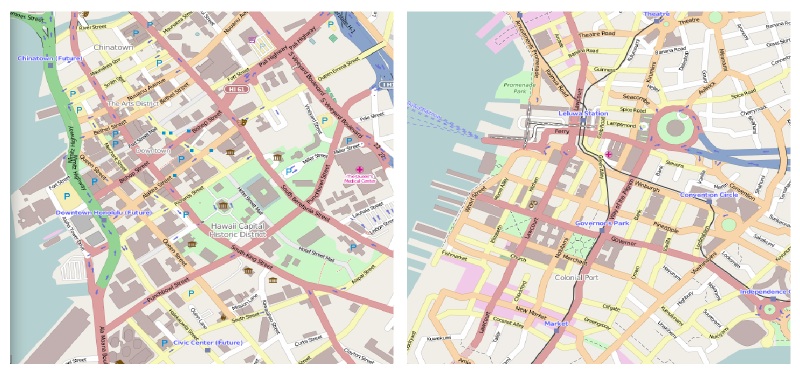
Honolulu (courtesy OpenStreetMap) and OGF's Leluwa, viewed at the same size, feature similar patterns expressed at a similar scale. One of these cities was a model for the other:
Singapore (courtesy OpenStreetMap) and OGF's Khaiwoon, viewed at the same size, show how a model city can help define the scope and features of an OGF city:
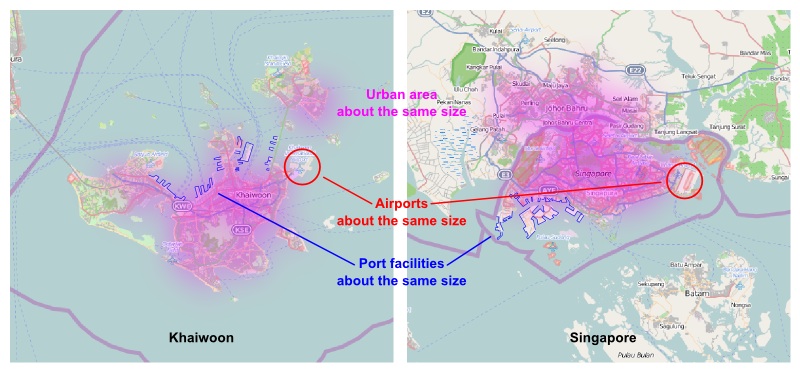
You can click on the map images above to see the comparison of the cities via the OGF scale helper.
Choose a site for your city and sketch out its history
When was your city founded? Where was it founded, and why was it founded there? How did it grow outward from that point of origin, developing into the city it is today?
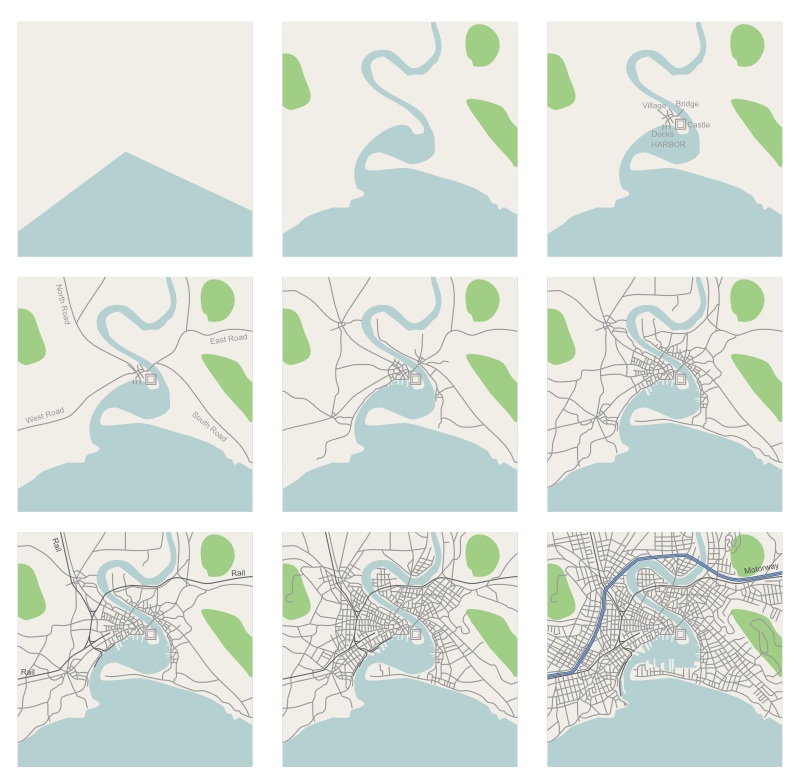
The easiest way to answer these questions is to sketch out your city in the order it happened in real life:
- First, creating a detailed topography (mountains/hills/river valleys/lakes/coastline...)
- Then deciding where the settlement might have started most likely (e.g. a fortress on a hill next to a river, a place on a trading route, a good crossing point of a river, a natural harbor...)
- Where would the transportation arteries (paths, roads and railways, articifial waterways) have developed
- How did the sprawl of the city develop in the period of industrialization:
- How did the European-style city develop when the fortifications had been removed during the 19th century?
- Where is the place for large industrial areas?
- Where are the areas built for workers during the 19th century and the early 20th century?
- Where were railways built and what purposes did they serve?
- How did the city develop when cars arrived? Where were motorways feasible?
(More advanced city builders will sometimes switch this order somewhat, for example drawing the infrastructure based only on a general sense of the topography, then adding topographical details later. But this may be harder for beginners, so be careful.)
Take a look at old maps of your model city to discover how it developed. For example, here are some maps showing the growth of a city on a river island:
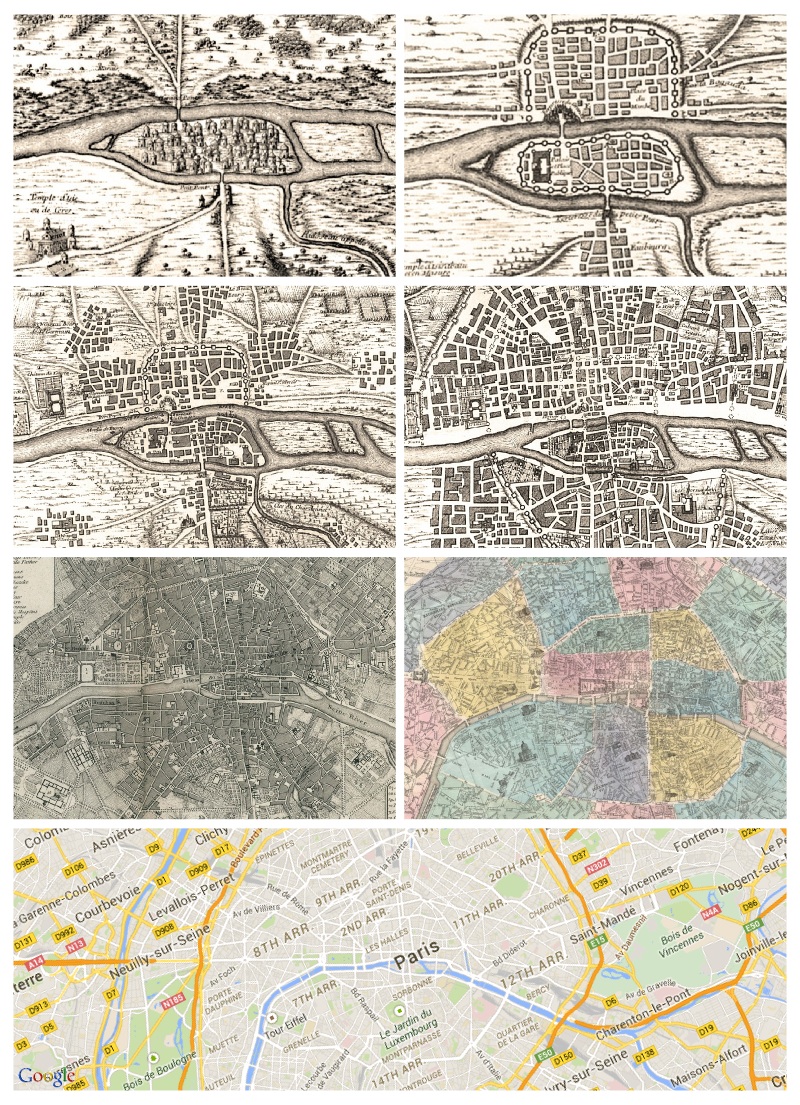
(Bottom image Google Maps; all others public domain)
Here's the growth of a newer city, originally built around a fortress:
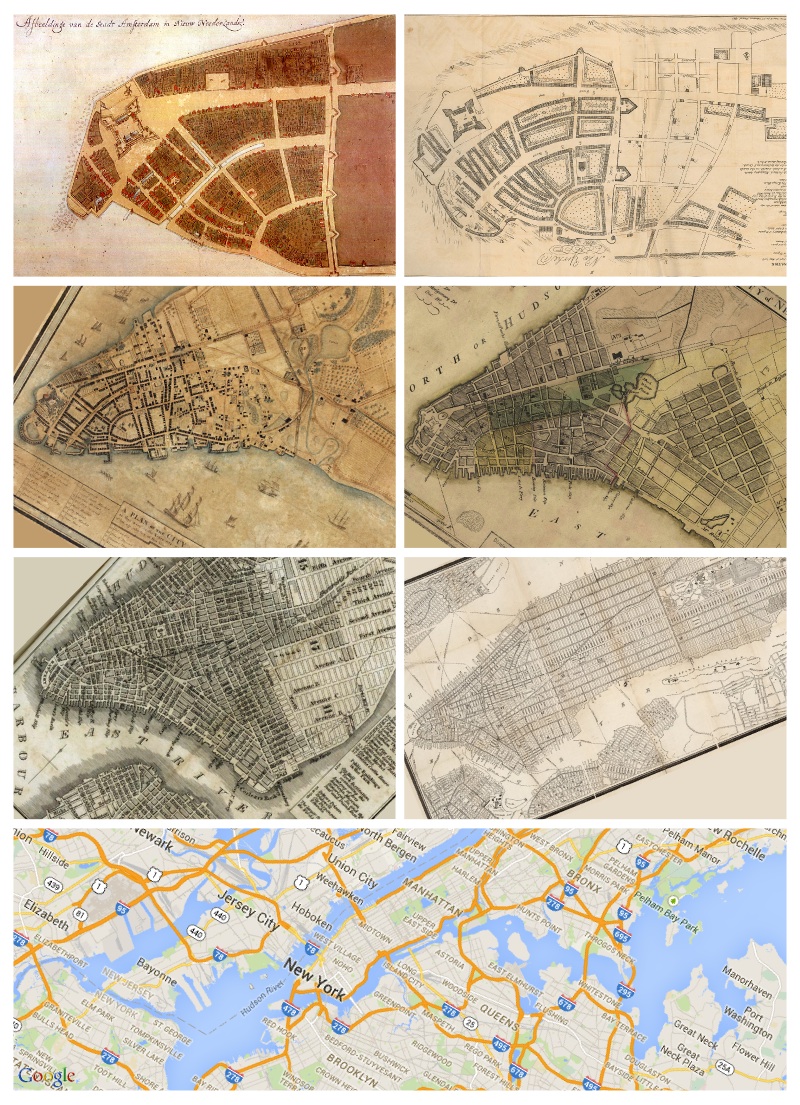
(Bottom image Google Maps; all others public domain)
By looking at the history of your model city, you can sketch out your own city's history in a similar way. For example:
Of course every city will evolve differently, based on its own history - this is just one possibility out of an infinite number. The point is to sketch out your city's history in the order it happened, to generate a modern layout rooted in a plausible history.
Add points of interest to your sketch, to make the city interesting and establish some flavors
If you're going to spend so much time building a city, why not make it interesting? Put interesting stuff in the city center, and at other focal points in different parts of the city. Whether you're building a gloomy totalitarian capital or a sunny tropical resort town, give your city flavor.
For example, the somber totalitarian city might feature a wide plaza of large government buildings with dubious names (e.g. "Central Propaganda Secretariat"), a couple of massive military bases, an area with large prison complexes featuring vast rows of barracks and factories, a huge monument to the glory of the nation, neighborhoods lined with identical apartment blocks stretching for miles on end, etc, etc.
A tropical resort town, on the other hand, might feature a number of sandy beaches lined with luxury hotels, a big waterpark or amusement park, a casino complex, a shopping mall with broad outdoor concourses, maybe a lively street of bars, clubs and restaurants catering to the tourists.
Decide what flavors you want to express, brainstorm a list of places that might help express those flavors, and then position those places all over your sketch as focal points to make your city interesting.
Street names and neighborhood names are also very easy ways to establish flavors. "Traders Lane" and "Cloth Merchant District" might make an area feel like an old trading town, while "Sailors Way" and "Captains Port" might suggest an old harbor district. "Tavern Street" and "Theatre Row" might indicate a nightlife area. See also Help:Resources for names.
Sometimes it can be hard to find the right balance of flavors. Too many different flavors can be confusing, but sticking too narrowly to only one flavor can be unrealistic.
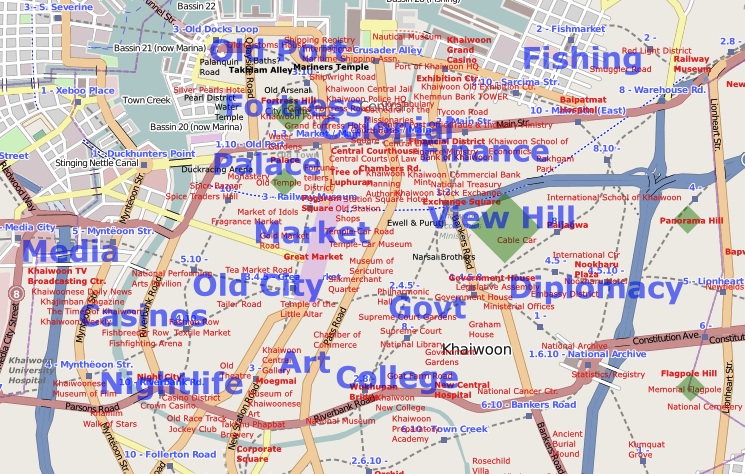
Here's a sketch of central Khaiwoon while it was still under construction, with neighborhood themes and various places of focus:
Take your time and focus on imitating real life detail
Don't fill up an area with random streets just for the sake of filling in an area. Don't try to finish quickly or fill in large areas at once. With everything you draw, take time to think it over, look at real life examples, and craft it carefully. Go back to your model city and practice imitating its patterns and details. Don't forget to add detail to your coastlines, too.
Time and detail are important because they directly impact the quality of your drawing. For example, one of the these images was drawn in twenty seconds. The other took five minutes. Can you tell which is which?
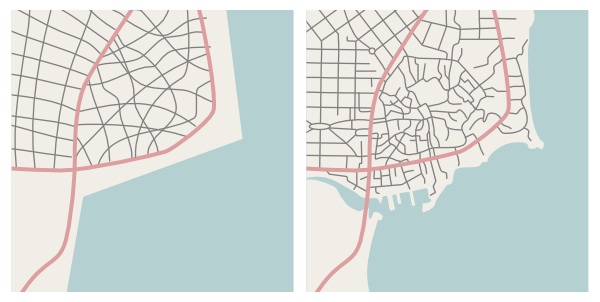
Notice how the drawing on the right has added detail to the coastline. Don't forget to do this!
Super-detailing
For very realistic maps, go into super-detail. At the very least you should add street names and building outlines. (again, check Help:Resources for names)
Street names often carry a lot of history. In a medieval town centre, they may be named for the trades that were found along each one - eg 'Baker Street', 'Fish Street', or more imaginative and sometimes humourous titles 'Long Leg', 'Drunk Alley' 'The Struggle' (a steep hill). In later eras they may be named after important people, important dates or events in the country's history, or on modern housing estates have a theme like trees, countries, mountain ranges etc.
Considering a town/city as a whole, at the very least it will in include the following municipal buildings:
- Town Hall or equivalent, and council offices
- Main police station
- Hospital(s)
- Fire station(s)
- Central religious building
- Schools and colleges, possibly a university or even two
- theaters and may be an opera
- Library
- Public transport depot
- Parks and sport facilities
- Water-works and water-cleaning
Buildings can take up a surprisingly small proportion of a city's ground area. It is likely that a building will have an adjacent area of garden, parking lot or yard as big as the structure itself. Any commercial building will require a back entrance via a yard big enough to drive into. For a small house, this will have a frontage about 5-7m wide and extend back around 10-15m. Houses are rarely square and will often have extensions or porch areas. A good comparison to bear in mind is that the largest standard car is around 5m long. Don't forget to set the buildings slightly back from the road - or further back in other cases. Larger buildings will usually have a courtyard at the centre to allow light to enter more rooms.
If the building is a business, tag it with the relevant description. You should also add traffic signals, post boxes, bus stops, public telephones, information points and other street furniture as appropriate. All these features make the map more realistic.
Don't make it perfect
A realistic city has "missing things" and errors. To create a realistic city in a fictional environment like OGF means the city has to follow "realistic possibilities."
When creating a city, one should have in mind that money is a very limited resource and that also in a fictional city in OGF, not everything is possible. Be creative with the limited financial resources! How about a gap in a motorway network or even a few gaps? A motorway unfinished for many decades? (The amount of motorways in the OGF world is extremely high in many areas!) A bypass road still under construction? How about a metro line in an important part of the city that is still missing? How about an extension of a residential area that has been planned for a long time but never been completed, with some dead ends of roads and so on or with streets and no houses?
Also, think about "ugly districts" of the city. Every realistic city has parts where the poor people live or districts with ugly residential houses e.g. from the 1960's or 1970's. Don't erase every mistake in your city! Realism can't mean a "perfect" city with unlimited financial resources, no crime and so on.
Remember to break the grid. When you are about to create a "regular" district, always be ready to break with the direction/system you initially developed for this area. What about one street with a slightly different angle? A hole in the grid for a park or a large building complex? A block turned into a square? Perfect grids are very unusual in the real world, most have breaks in various ways. Look at real life grids for examples.