Help:Making realistic railways/2
| < | > |
This is part two of the railway tutorial series. The previous chapter covered a lot of theory, railway history, etc. This chapter focuses on the actual drawing, and the topic is junctions and landscape.
What to know about curves, tunnels and such
Is anyone familiar with the Microsoft Train Simulator or any similar game? You may have noticed that when you start creating a new map, the terrain is completely flat by default. You can raise a mountain that's 5,000 meters high out of nowhere and you're able to build a train track climbing up the nearly vertical slope. However, the OGF world is earth-like and physics do apply here. So if you're used to railways from simulators like Cities: Skylines, prepare to forget everything you know about them.
Useful tip number one: Railroads stay at the same elevation whenever possible. Trains are the most efficient of perfectly flat tracks, climbing up a hill requires extra fuel. And so instead of going over a peak, the tracks pass it by using a curve. Sometimes it's enough to build a cutting or an embankment - so the tracks can continue straight forward, in curves the maximum speed is lower. It is all about balance. Sometimes, especially in densely populated areas, railway lines have to avoid settlements and other man-made obstacles as well.
Useful tip number two: when there is a difference in elevation between the start and end station, the tracks use a gradient. In other words, they tracks are flat at first, then the slope inclination starts gradually increasing. Just like with curves, there are no sharp edges.
The slope gradient is written in per mil (1/1000; ‰ sign), where 1‰ means the track elevation will change by one meter in a thousand meters. Modern lines seldom use gradients steeper than 20‰, the steepest you can get without a special cog-wheel equipment is some 50‰, but that's already on the brink of practicality.
Curves have an important parameter and that is the radius. It's exactly what it sounds like: if the curve was a full circle, the radius would be its radius. However, because of inertia, the arcs have to be a reasonable size, so the trains can drive fast enough through them. It's a lot of physics, so here is this simple table:
| Radius | Maximum speed | |
|---|---|---|
| 150 m (absolute minimum) | 50 km/h | 31.07 mi/h |
| 200 m | 60 km/h | 37.28 mi/h |
| 270 m | 70 km/h | 43.5 mi/h |
| 350 m | 80 km/h | 49.71 mi/h |
| 450 m | 90 km/h | 55.92 mi/h |
| 550 m | 100 km/h | 62.14 mi/h |
| 650 m | 110 km/h | 68.35 mi/h |
| 800 m | 120 km/h | 74.56 mi/h |
| 950 m | 130 km/h | 80.78 mi/h |
| 1050 m | 140 km/h | 86.99 mi/h |
| 1200 m | 150 km/h | 93.21 mi/h |
| 1400 m | 160 km/h | 99.42 mi/h |
| 1750 m | 180 km/h | 111.85 mi/h |
| 2000 m | 200 km/h | 124.27 mi/h |
If anyone cares to know, these values are for cant 150 mm and gauge 1435 mm, the standard in Central Europe.
The track speed however also depends on the condition of the tracks and the slope inclination. The curves should always be as large as the terrain allows or as the fastest trains can go - it doesn't make sense for a branch line used for transporting coal to have arcs spanning kilometers in width. Tag your tracks with maxspeed=value in kmh to denote the maximum speed allowed.
Another thing affecting the speed is the gauge. That's the distance between the two rails on a track. Smaller gauges allow curves with small radii and are cheaper to build, however the trains can't go very fast in order to prevent derailment, and so narrow gauge railways are mostly restricted to industrial spurs or mountainous areas. The (literal) standard gauge is 1435 mm but a variety of others exist as well. Tag your tracks with gauge=value in millimeters.
The last option are bridges and tunnels. Draw them sparsely, and only when really necessary, like in cities or difficult terrain (e.g. mountains), because they cost a lot to build. Bridges over bodies of water are usually straight and perpendicular to the flow, in order to save money and engineering work.
Now that you've learned all the theory, it's time to get to the practical part: How to actually draw railways?
Tips and tricks for drawing railways
Disclaimer note from Eklas, the original tutorial author: I use JOSM. I used to work with iD back when I was an active OSM contributor, but I strongly feel like JOSM is the best editor for OGF. Once you get used to it, you'll find out how fast and powerful it is - it has all these special tools, niche add-ons and customization options none of the other editors have. It also allows for more precise mapping, which comes in very handy when you're drawing railways.
Curves
Here's how to draw a nice, even arc using JOSM in five steps:

- Step 1: Draw the tangents (the straight lines at the ends of the curve.)
- Step 2: Draw a line with three nodes where you want the curve to be.
- Step 3: Press Shift+O and the line will turn into a circle. Resize using Shift+Alt and click-dragging your mouse as necessary. Before the next step, it may be advantageous to turn on the Wireframe view from the Map paint options on the panel on your left. It is minimalisitc, organized, and runs really smooth even when handling large amounts of data.
- Step 4: Cut out the excess part. Make sure the radius of the curve is realistic using the Parallel line tool (Shift+P) - you can see the measured distance on the bottom panel.
- Step 5: Connect the curve to the straight lines as precisely as possible.
Tag appropriately as described last time. You can also follow the curve by another curve going in the same or opposite direction, depending on the terrain.
Railway curves aren't actually perfectly circular. Each curve has a transition (easement) section, which is a parabola connecting the circular part to a straight track. As the name suggests, this prevents unnecessary wear on the wheels and increases the comfort for passengers, who don't get thrown off their seats by inertia every time the train turns. Drawing that by hand can be difficult, JOSM has the Splinex plugin which can be used to draw spline curves that could help. However, these segments aren't very long, railway curves are close to being circular as a whole and drawing parabolas is difficult (even though JOSM has a plugin for it), so this is really an extra option for railway gourmets and radical realists. The rest of us can peacefully sleep at night knowing our tracks are a simple circle.
Curves should be drawn smooth enough. It really depends on the size of the curve and on how detailed the area around is, but in general 1 node/50 meters of length is the bare minimum unless you're only sketching. You can add new nodes to an existing curve and then make it circular by pressing the O key.
Last but not least, mind the radius as explained in the previous paragraph.
Multiple tracks
As mentioned above, JOSM has a useful parallel line tool. You can create a parallel line or object by selecting one with the tool (activated by Shift+P) and click-dragging your mouse to the desired position. The space between tracks differs depending on the terrain, but since the parallel tool only allows whole numbers and their +0.5, 4.0 or 4.5 meters as the distance between two tracks is a good guide. It also depends on the gauge you're using, narrower tracks allow for smaller distances between them.


Junctions
A junction is a place where two or more railway lines meet - the equivalent for roads is an intersection.
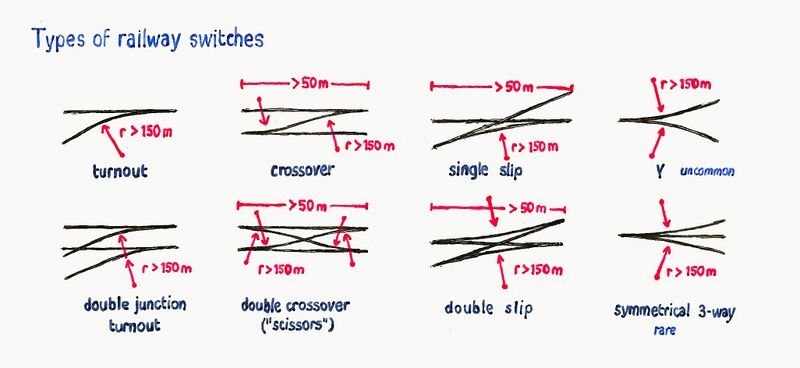
Each junction consists of multiple switches. Switches allow the change between different tracks. Over the years, several distinct switch types have developed that are predominantly used - yes, there are other types as well, but they're really minor. The ones in the illustration on the left account for 99% of the world's switches.
- First of all, make sure your junction is a realistic size. The individual switches are rarely shorter than 50 meters (obviously depending on the track layout.)
- Watch out for the curve radius once again. This time you might go as little as 200 meters, because the maximum speed at junctions is low for safety reasons anyway. However 150 m is the absolute minimum that's physically feasible.
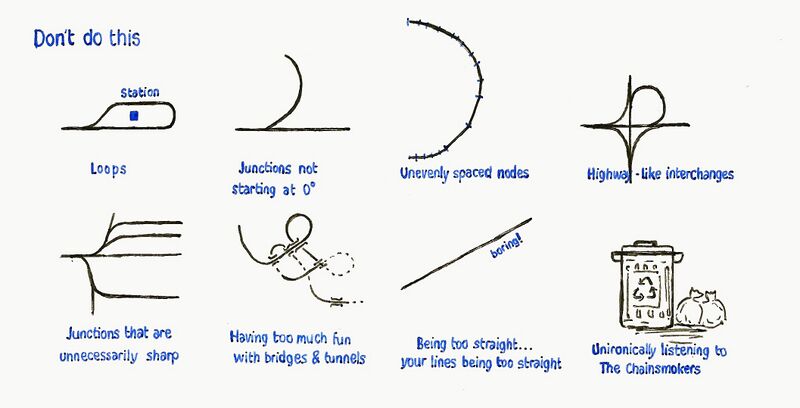
- Just like curves, junctions start and end at 0° to the original stretch. So many mappers get this wrong. Tracks aren't streets or tree branches, they can't just break off of the original segment at a right angle.
- Look at real world examples. Junctions come in different shapes and sizes. Browsing maps and especially aerial view helps greatly with understanding junctions. There are millions of stations in the world, look around, find inspiration.
- Lastly, make sure to tag the initial node of a junction with
railway=switch.
Hey also, the three-way switch is used REALLY sparsely especially in industrial works, because it's prone to incidents and has high maintenance demands. Typically, tracks split in two.
Other things to watch out for
- Heavy rails don't typically have loops. They're unpractical because of the space they require, so they're only sometimes seen at depots and cargo yards. If you desperately need to turn an engine around, there's a turntable or a triangle, but more on that in part 4.
- Make sure the lines look smooth enough and the nodes are distributed evenly.
- Railways do have interchanges too, however: only use them at the main lines and near important transport hubs, i.e. large cities. Usually a station or a regular junction is enough.
- Be realistic when drawing bridges and tunnels. Unless your country is like Switzerland, chances are you don't need overly complicated sets of viaducts and tunnels. It's not that you can't have any, but you should know when to stop.
- Add some detail to your lines! Straight things are sometimes really bland, like coastlines, or... uh, anyways, the longest straight railway segment in the world is in Australia and it spans several hundred kilometers, but in most countries, terrain is more diverse so don't be afraid to put a little curve here and there.
Exercise
This time, it's fairly simple:
- Draw some detailed curves. Last week you have sketched the railway, now it's time to add more to it. You don't have to limit yourself to just curves: draw small bridges over rivers and streams, add a dirty road running adjacent to the track, place a small forest somewhere... the landscape is a blank canvas and you're the painter.
- Start thinking about population more. The next chapter will cover stations, and these are usually located where people live, which you should know before you start drawing them. Lay out some villages and farms, maybe draw a couple tertiary roads.
| < | > |