User:EMKLI/Create realistically looking lakes or islands
Creating random-looking formations like lakes, wood patches or islands is not an easy task. First of all, if you create many of them manually, they often don't really look "natural" or "fractalized" enough. Also, it is a lot of work.
I would like to show you a method that I used for creating the lake landscape in Nordurland. It will allow you to create lots of these items at once, in a relatively fast manner.
Note: this tutorial is not meant for beginners. You should have mapped a considerable amount of features already before even touching this. You should be familiar with JOSM and its quirks. Don't upload tons of stuff just because you can. You can create nice landscapes when folliw this tutorial, but also a lot of garbage.
What you need
- A screenshot tool
- JOSM with the importvec plugin installed
- Optional: a bitmap editing software. It can be as simple as M$ Paint.
- A vector editing software. For the tutorial, I used Inkscape. The way to do things may vary in other softwares.
- An image file that contains "patchy" data.
- A lot of patience.
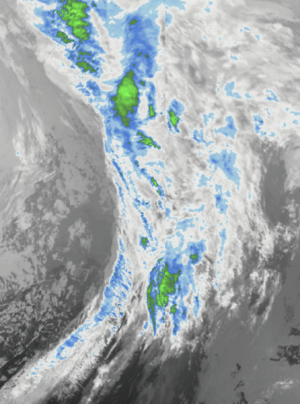
The screenshot I used for this tutorial. Yours may look completely different, just choose one that is to your liking.

Regarding the last point, although I have written that you can create results relatively quickly, this process is still pretty long, tedious and requires a lot of manual work. Do not expect quick satisfying results, especially not at the first try. It will take time. Think in multilpes of hours, not minutes.
For the sake of this tutorial, I am assuming that we are going to create lakes and islands, so I will use the terminology accordingly. But you can create all sorts of random-looking structures with that, like patchy forests, swamps, ...
What we will do
- search for an image that satisfies our needs
- load that picture as bitmap into Inkscape
- trace the bitmap in Inkscape to vectorize it
- check the results and choose the paths you want to use
- arrange your paths to create the landscape in Inkscape
- save the result as svg and import that file into JOSM
- clean up import errors and tag in JOSM
- upload your creation and check for coastline errors
Search and import
The first taskis to find a source for one - or better - multiple images. A good source is weather data, especially clouds and precipitation. They often create random-looking shapes in sequential order. Please be aware that you are most likely using someone else's data here. You are obliged to check if the distributor allows the use of the data for non-commercial purposes.
Search for an image
For this example, I used Wundermap. For getting nice results, I've deactivated the Weather Stations layer and chose the Radar and Satellite layer instead (which gives you cloud and rain data), with opacity for both set to 100%. Also, I chose an area in the open ocean, because this reduces borders, names and other features that I don't want to have in the picture.
Find a good spot that contains many patchy objects, then, take and save your screenshot.
Optional: If you already know that there are parts in your image that ar not suitable for vectorizing, I recommend to paint over them before you import your picture to Inkscape in the next step. You can use any bitmap editing software for that. Problematic parts are any letters and designations, borders as well as parts of landmasses.
In your paint program, you can simply white out any landmasses at the borders of your image. For text or borders in the middle of the area of interest, I recommend using the surrounding color.

Vectorize the image
When you've found your picture, it is time to open and trace it in Inkscape.
- In Inkscape, select File -> Import to load the image you've just saved. Go with the default settings, you will delete the original image anyway
- Select the imported image and choose Path -> Trace bitmap from the menu bar.
- I usually go with the following configuration, but you can try out any other that suits your needs.
- Select Multicolor. Choose Colors or Grays as Detection mode. Check Stack and Remove background.
- Choose the number of scans that is equal to the number of features in your map (i.e. the number of colors that occur in the image). Check the results in the preview.
- Optionally, play with the other (slider) values as well. You can't techincally go wrong here, it is a matter of personal taste.
- Click Apply when you are finished and give the program some time for the tracing. You get a group of layers with (probably) multiple paths, each representing the layers Inkscape found in the picture.
- You can repeat the process and import and trace multiple images at once. That gives you a big pool to choose from later.
Getting creative

This is the fun part. You will now extract the elements of a (hopefully) big amount of shapes you've just got.

Select the data you want
- You can begin with ungrouping the layers with Object -> Ungroup. This sets all traced layers free to move individually. For every scan, you will get one layer in a different color. They may not differ too much, like in the example. This depends on how your image looks.
- If you have multiple paths in a layer, you can use Path -> Break Apart to separate them. This sets free all the single paths and allows you to move and reshape them individually.
- Beware: after you broke them apart, you may find smaller shapes hidden beneath bigger ones. This can be in your favor if you want to have lakes with little islands inside - or not. Just a heads-up. If in doubt, move around bigger shapes to see what's behind them.
- If a layer of data does not look promising at the first glance, you may try to invert it. For that, enable snapping in Inkscape (it is disabled by default) with the magnet button at the very top right. Then, draw a rectangle with the exact dimensions of your layer. Then, choose Path -> Exclusion from the menu bar.
- Still, not all the data you've created may be useful to you. Delete as many paths if you need to. Also, you can always go back and try to get a better image.
Create your landscape in Inkscape
Now, you can freely arrange the shapes you've just got. Some tips to deal with the data.
- If you want to merge multiple items, select them and choose Path -> Union.
- If you find your edges too smooth, try to apply the Roughen path effect. Select Path -> Path effects. On the right, click to "+" and select the Roughen effect. Go not too crazy with it though as it may create lots of self-interecting lines in JOSM later.
- Move, adjust, deform and arrange your lakes or island shapes as desired.
- If you want to join shapes, use the Path -> Union function. You can, of course, also try out the other ways of joining that Inkscape offers.
- You can totally ignore the page layout, but it may be useful for comparing your creations if you have multiple of them.

Export your result
When you are satisfied with your result, we have to do some cleanup to get the data as lean and clean as possible into JOSM. The more we clean here, the easier the import gets. From my experience, the SVG import to JOSM is a bit unstable.
- When you are ready to export, make sure you've deleted everything you don't want to include in the final result. Otherwise you will sit in front of JOSM and ask yourself why the import takes forever. I know what I'm talking about... ;-)
- Overall, don't go too crazy with the amount of things. Importing an SVG to JOSM is not a fast process and can render it unstable.
- Select everything in your document that you want to export and select Path -> Simplify. This is highly recommended. If you don't to it, the import into JOSM will take forever, especially if you have many items in your drawing.
- Save the image as SVG.
Transferring to OGF
Now it is finally time to make your creation into a map. But before that, we have to clean the data... again. This time, in JOSM.
Import to JOSM

A word of warning: the import to JOSM feels somewhat unstable and it takes a lot of time.
In JOSM, make sure you have the importvec plugin enabled.
- Before you begin, save and/or upload all pending changes and close all unnecessary layers. JOSM takes longer the more nodes there are in the map, with exponentially growth of time as it seems.
- Create a new layer. Do not use any existing layer.
- Click File -> Open and select the file you've just created with Inkscape
- Here, I encounter a little bug because a window with a progress bar pops up that never closes again. I am only able to kill it with the X button, (not the cancel button).
- A small window will pop up. Here, you can change the scale of the imported data. I normally go with a scale of 1:50 or 1:100, but it depends on your desired scale, of course. Try some things out.
- For the edge factor, I would not go higher than the default 4. The more you set here, the more detailed your lakes will be, but the import time will get considerably longer.
Now, brew yourself a huge can of coffee. Importing can take a lot(!) of time. You may see some progress in your map window while the import takes place - not in the little window with the progress bar though, the progress here will always be 0%, so don't get fooled by that. More and more empty nodes will appear over time and they will eventually be connected with ways in the end. But the process is slow. Importing the data we've created in the picture above took about an hour.
If you have the feeling that nothing happens anymore, be aware that progress might also happen outside of your current visible map area. You can always check in the bottom right corner of the window. You should see a text like this: ...changes Σ = 13664, still counting up.
But if JOSM really doesn't work anymore, you have no other choice than killing it altogether. If this happens, go back to Inkscape and divide your image in two or more separate files. Upload each of these files separately.
Prepare the data for upload
Your data is now in JOSM, but if you think you are ready, think again. Because now, the biggest part of the work starts. Because you've just imported hundreds or thousands of nodes into JOSM, and the data is not necessarily clean. You may have overlapping paths, islands in lakes (like I've said before, there may be paths hidden below other paths which might not be visible in Inkscape), self-intersecting paths, double nodes and open polygons.
Also, your data may contain lots of polygons with only 3 or 4 nodes, or some that are really small. Think thoroughly if they really are a valuable addition to the map. You should either edit them later on (or better: right away) or delete them altogether. You will find a tip how to quickly search for and select them below.
In my experience, preparing the data for upload is the part that takes the most time. Patience and a strong machine are the key here. Make excessive use of the error checking function and save as often as possible. I would reccomend the following steps in this exact order:
- Before you do anything else, save. Then move the objects to the exact place you'd like to have them.
- First, check for erros. You can autocorrect most double nodes.
- Clean the errors as much as possible.
- If you want to merge overlapping polygons, use
Shift + Jto join them. - Check for very small polygons as you may want to delete them. For that, use the search filter.
- For example, if you want to delete polygons with a low node count, you can use a filter:
type: way nodes: 0-4will select all nodes with a maximum count of 4 nodes - You could also define a certain area:
type: way areasize: 0-5would select all polygons with an enclosed area of max. 5m².
- For example, if you want to delete polygons with a low node count, you can use a filter:
- Then, define your multipolygons. Tipp: there is an experimental function in the UltilsPlugin2 extension that allows you to select everything within a polygon. You find it under Select -> Select eyerything inside. It works for me but your results may vary. It also selects the nodes, so you still have to manually select polygons only.
- If you have only one kind of thing you want to tag (lakes, in this example), it is now very easy to select all remeining untagged ways. Create a filter:
type:way & untagged -child. This excludes your previously tagged multipolygons and you can't overlook small polygons. - I recommend to reduce the amount of nodes before you upload. Use the search filter
type: way nodes: 30-. For the reduction, I choose a factor of 5m here. Then, with the active selection, pressShift + Y,which is the shortcut for Tools -> Simplify Way. For the example data, it removed around 10.000 unnecessary points without losing a relevant amount of detail. I did not try the SimplifyArea plugin, but I'm sure it works accordingly.
- If you created or edited new coastlines, check for any errors you've made. Be very thorough here. Better check twice.
Upload and second coastline check
If you think you are ready, upload your creation to the server. If you have touched any relations and coastlines that require the utmost carefulness, I strongly recommend to upload these changes first, in it's own changeset.
Upload coastline changes
Seperate all items that change the coastline and bigger relations to a new layer.
- You can do this by creating a new layer, make the import layer active again, select the items involved and press
Ctrl+Shift+M(or choose Edit -> Merge selection). - Then, you choose the newly created layer. Check if everything made it across.
- Then save and close the layer with the remaining data for now.
- Fix all coastline errors that JOSM throws at you and check for duplicate points. This is an easy to miss source of error that will stop OSM from re-rendering.
Do a final check if everything is ok, then upload. Wait for the next half hour to pass, then isit the coastline checker to check for more coastline errors. Correct any errors that you find and upload the corrections.
Upload the rest
Well, this is straight-forward. With your coastline uploaded and checked, open the layer with the remaining content and upload everything. Although, it doesn't hurt to run the problem checker again, because sometims, JOSM doesn't show all errors in the first run, for reasons unknown to me. I guess this happens especially in bigger changesets.
You are finally done!
Troubleshooting
The process is long and tedious, but the only thing that really can be messy is the import to JOSM. But the more I've tried this method myself, the more I came to the conclusion that JOSM never failed to import my data. Mostly, it was my own fault because I was either to impatient or I forgot to delete stuff in Inkscape that was not meant to be imported and outside of the visible map area.
Still, with an older machine, it might be more cumbersome. If JOSM fails to import your data or just takes too long, you have to reduce the size of the import. The different steps to achieve this were mentioned along the tutorial, but here is a summary you can return to if you run into problems.
You can reduce the import size with one or more of the following measures:
- In inkscape, choose less objects or split them to several files and upload them separately, to different layers. In fact, JOSM seems to deal much better with many open layers, even with many objects each, than one big one. Also, the more nodes it has to add to one layer, the slower it gets. The first nodes are added in a blink, but then the process gets visibly slower, there seems to be some exponentiality.
- In Inkscape, use the Path -> Simplify command.
- In JOSM, choose a smaller Edge Factor when importing the SVG. I didn't do exact maeasurings, but I suspect an exponential time growth by any increase by 1 here. Reducing the factor to 2 will, in any case, significantly speed up the import. This comes with the cost of having lots of small 3- or 4- edged objects in your import though.
Comparisons of the aforementioned steps in map quality

To compare the number of nodes that are created when importing to JOSM, I used the group of shapes as seen at the right. I did not measure the import time.
TBD
| Inkscape | Edge Factor 2 | Edge Factor 4 | Edge Factor 6 | Edge Factor 10 |
|---|---|---|---|---|
| Roughened | ||||
| Untouched | ||||
| Simplified |